
So you want pretty designs on your loaf of bread? Well it sounds like you need some bread scoring tips!
Table of Contents
Bread Scoring Tips Aren’t Just for Professional Bakers
Have you ever walked by a beautiful display of bread with intricate designs and wished you could be so creative? Well, you can. It might take some time to learn techniques. And you might need to start early for the perfect holiday bread, but you definitely can make artistic designs on the top of your loaves of bread.
While some people might think bread scoring is hard, it’s more about practice and technique than anything. Knowing what tools to use, how to make the marks and what ingredients to use requires some skill, but also trial and error.
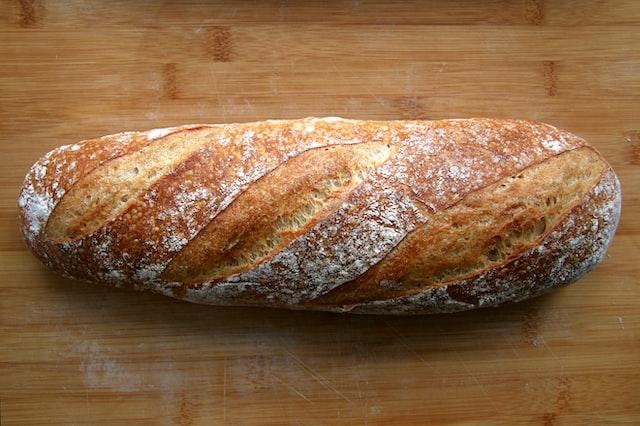
Bread Scoring is All About the Surface
The surface of the dough is where your mark needs to be made. What professional bakers learn quickly is the technique of cutting shallow slashes into the surface of the bread dough before baking is the biggest secret.
The purpose of scoring bread is to control the expansion of the bread during baking (which makes the designs.) When you do the cutting correctly, it creates a beautiful pattern that’s visually appealing. How you create you design and then offer the cuts to the dough is what makes your bread delightful!
Here are our 6 bread scoring tips for beginners:
- Use a Sharp Blade. A sharp blade will make clean cuts and reduce the likelihood of tearing the dough. A lame (which is a common tool used when scoring and designing bread) or a sharp kitchen knife can be used for scoring.
- Score Your Bread at a Shallow Angle. The angle at which you score or cut the bread is important. A shallow angle (30-45 degrees) will ensure that the cuts open up and create the desired pattern during the baking.
- Choose a Pattern. The way to a visually enticing product, it to decide on a patter before scoring the bread. Simple patterns, such as a cross, tic-tac-toe pattern and even slashes at different lengths are perfect for beginners. Getting comfortable with the cuts and the results of the cuts is your first step.
- Don’t Over Score Your Bread. If you Make too many cuts you can cause your bread to deflate and results will be an ugly, dense loaf of bread that you don’t want to be looking at. Make reasonable cuts, but don’t overdo it.
- Flour the Blade. Before you cut or using any tool, dip the blade in flour to make sure it won’t stick to the dough. This is important as a crack will develop any place on the top of the loaf where a tool has stuck.
- Score Quickly. The faster you make your cuts and get it into the oven, the better. If you take a long time you risk deflating the dough and creating a disappointing result.
It’s important to consider what bread scoring patterns you’d like to tray. The more comfortable you become with the tools, patterns and designs, the easier it will be to create the perfect visual top to your bread. Of course, it’s important to remember there are over 17 types of bread, so knowing which type works best for your design is important too. Who knows, you might even have your bread in windows like the professional bakers too!
In Conclusion
We hope our bread scoring tips help you get started in your journey of bread art. Remember, practice makes the perfect design. While you might need to work on your style and techniques, it’s possible to offer some amazing holiday bread art to the world.


No Responses